


Welcome everyone. I’m Bucaval, a music producer. I usually use IMAGE-LINE FL Studio which is installed on my Windows PC. In the first installment of this series, I will be introducing some of my favorite features that have been added/improved in the latest v21.
You can set the project screen color to your preferred color scheme using the theme
When talking about the FL Studio monitor, many people probably think of a grayscale based monitor. In this version 21, a new function called Theme has been added, which makes it possible to change the color of the screen to your liking. The default screen color is attractive enough, but if you can change the screen color to match the vibe of the song, you’ll be able to work on producing your music much smoother and happier.
To change the screen color, click “OPTIONS → Theme settings” from the menu panel at the top left of the project screen, you can do this in the Theme tab of the settings screen that appears.
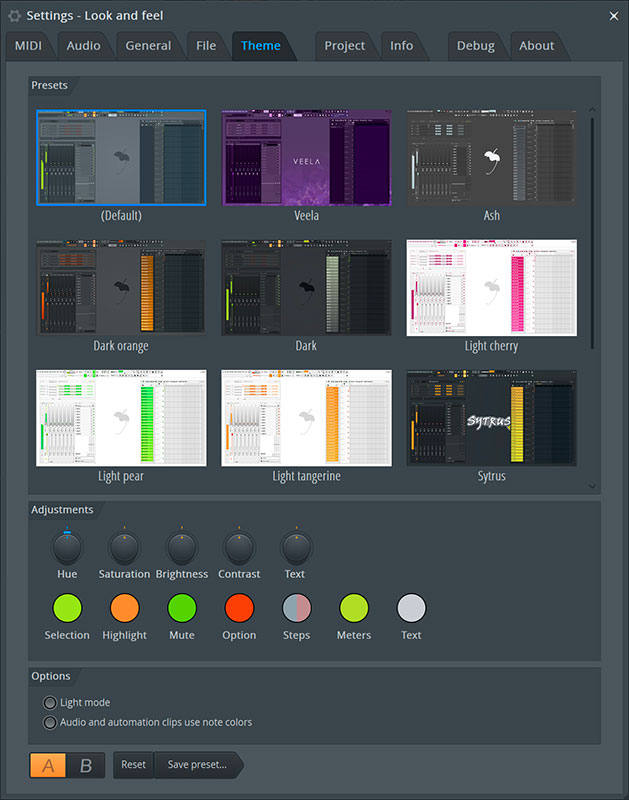
There are 10 screen color presets in this tab, just choose one to apply the screen color change. If you just want to experiment with different looks, these basic presets are a good place to start.
If you want to customize it to your liking, you can make detailed settings like hue, contrast, and brightness in the Adjustments section at the bottom of the Theme tab. The Hue knob adjusts the color tone of the entire screen, the Saturation knob adjusts the color intensity, the Brightness knob adjusts the brightness of the entire screen, the Contrast knob adjusts the relative brightness of each element on the screen, and the Text knob adjusts the screen brightness. You can adjust the brightness of the text above it.
In addition, a more detailed customization is possible with the select button, the highlight button, the mute button, the option button, the steps button, the counters button and the text button in the lower part of them. When I set the screen color, I specifically set contrast and brightness. By modifying these elements, it will become much easier to see the characters and piano drums on the screen, and the usability will also improve. Please use the theme function and set the screen color as you like.
Use the favorite function to improve work efficiency! The sample preview is now displayed as a waveform
Sample packs and sample materials are some of the most used tools in producing any kind of music these days. Many people who have been making music for many years own a large number of sample collections. I myself am one of them. With so many sample packs out there, it can take you several minutes to find what you’re looking for.
However, with this update, a favorite function has been added to the browser on the left side of the project screen.
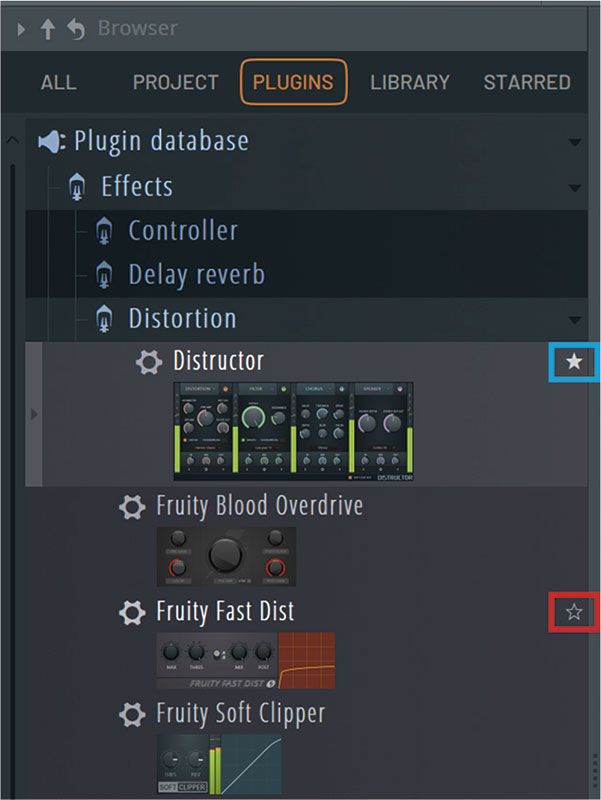
The browser is a screen for project file management, and FL Studio includes tools/effects, third-party plug-ins, sample packs and sample materials. If you hover your mouse over a sample material or effect you like on this screen, a “☆” will appear. Masu.
With the favorite function, you can quickly find the material samples and additional components you need for your production. This will save you a lot of wasted time and allow you to focus more on producing your music.
There is another feature I love about the browser in v21. The preview of selected sample material in the browser has been improved. So far, the selected sample material waveform has not been displayed in the browser, but it is now displayed in version 21.
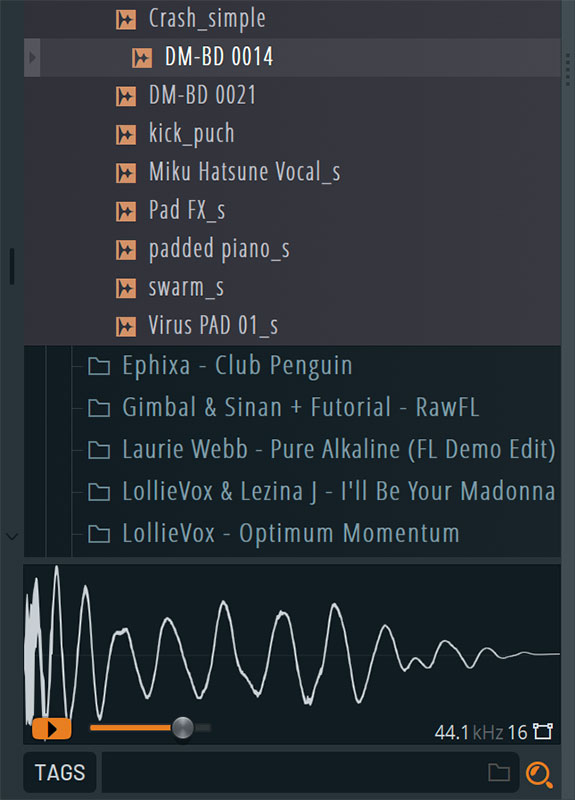
You can play the waveform by clicking the “” icon at the bottom left of the browser screen, but you can also preview from this position by placing your cursor anywhere on the waveform and right-clicking (command + click on Mac). Is it possible. This function is useful when selecting sample materials other than a single shot.
Fade in/out Process audio clips for more intuitive playback
Previous versions allowed you to fade and adjust the gain of tracks, but the update makes editing easier and more intuitive. This is the part of this update that I personally feel is the most practical.
Let us explain the specific operation method. When you move the pointer over an audio clip, triangular marks appear at the ends of the clip.
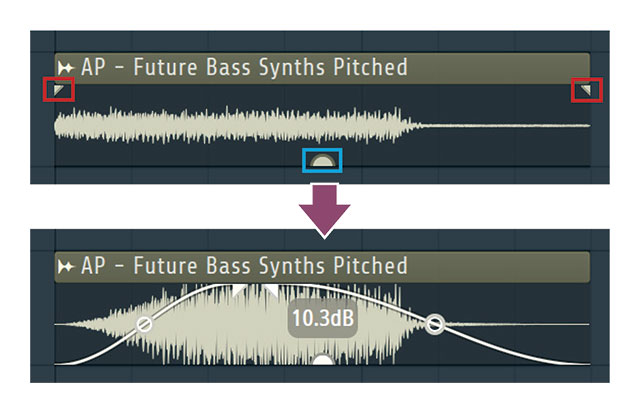
The fade in/out can be adjusted by dragging them left and right. Additionally, a semicircle appears in the bottom center of the audio clip, and you can adjust the gain by dragging it up or down. Moreover, since these operations are only applied to each audio clip, there is no need to set the Make Unique function, which allows partial editing of audio/MIDI clips in a playlist. By the way, if you overlap audio clips that have undergone the fade in/fade out process, they will automatically fade in, which is a good point for users.
For my personal use, I often use it for FX and drums. In particular, you can create cool grooves by applying a fade treatment to each part of the drum. The trick is to check it out with your ears and not overdo it.
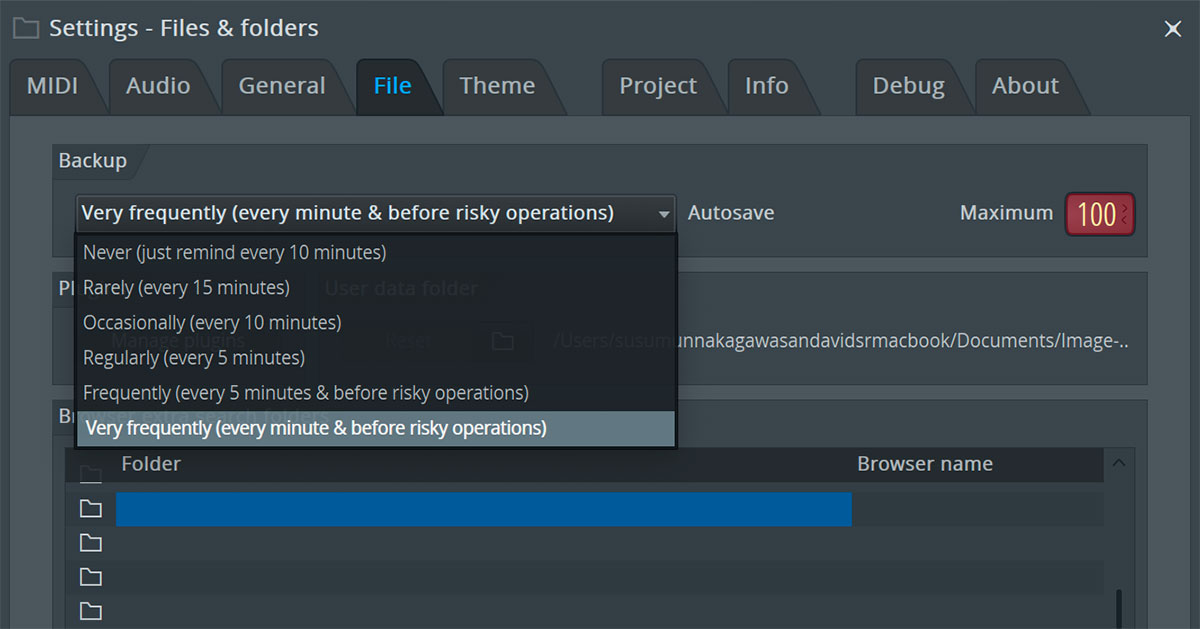
The last thing I would like to introduce is the autosave function. Perhaps the biggest enemy of our DTMers is sudden computer crashes. Previous versions had auto-save, but with an interval of at least 5 minutes. Version 21 enables automatic saving every minute. Settings can be made in the Backup section of the Settings screen File tab that appeared in Theme Settings.
With this, you will be able to work without worrying about sudden accidents. See you next time!
bocaval
[الملف الشخصي]Hip Hop Producer and Beat/Lube Maker was born in 2000. In 2020 he started making music with IMAGE-LINE FL Studio. To date, in addition to overseas rappers such as Lil’ Kid and Hanks Ho, he has provided music to JP THE WAVY, LEX, Only U, Sound’s Deli member Tim Pepperoni, and Showy in Japan. Also produced music for online commercials for the online game VALORANT. It features sad episodes using piano and synthesizer.
【Last Work】
“treasure”
flashy
(Fashionable Production)

Lined up
The decision to release the package!
FL Studio 21 Fruity: 19,800 | FL Studio 21 Producer: 33,000 | FL Studio 21 Signature: 39,600 | FL Studio 21 Signature Crossgrade: 25,300 | Commentary Book Package:: 27,500 yen
requirements
▪ Mac: macOS 10.13.6 or later, supporting INTEL or APPLE Silicon M1 processor
Windows: Windows 8.1/10/11 or later (64-bit) INTEL or AMD processor
General: 4GB or more free disk space, 4GB or more RAM

“Travel maven. Beer expert. Subtly charming alcohol fan. Internet junkie. Avid bacon scholar.”
More Stories
Instax Mini 99 is a multi-functional Instax device with manual control and fun effects: product review WIRED.jp
Intel Arc & Iris Xe 31.0.101.5522 WHQL driver released
32GB + Ryzen7 ThinkPad E14 for 128,700 yen! An expensive but extraordinarily profitable blog |